Tuesday, 5 November 2013

Configuring XML to Use a Different Port in XenApp 6

Following step-by-step procedures decribe how to configure Citrix XML Service port to use a different port in XenApp 6. Here I will change the XML service port to 8080, which is recommended by Citrix to be used as XML port.

Steps
  1. Stop the Citrix XML Service. To do so, you can manually stop the service or go to Command Prompt and execute the following command:

    net stop CTXHTTP
     
  2. Now you have to unregister the XML service. To do so, execute the following command:

    ctxxmlss /u

     
  3. To confirm this go to Services console and you will not be able to view the service calledCitrix XML Service.

     
  4. Now execute the following command to register the XML service to port 8080.

     
  5. To confirm the change, open Services console and there you will see the service called Citrix XML Service. The service will be in Stopped state.

     
  6. To start the Citrix XML Service execute the following command:

    net start CTXHTTP
     
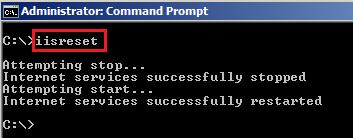
  7. Restart IIS by the following command:

    iisreset


  8. Open Citrix Delivery Services Console, and expand the Farm that contains the server. Select Policies node, and click the Computer tab. Select the policy named Unfilteredand then click on Edit button.

     
  9. Click on Next.

     
  10. Select XML Service and then click on Add button of XML Service Port.

     
  11. Enter the port 8080 in the Value text box and click OK.

     
  12. Click on Save.

     
  13. Execute the following command to update the policy.

    gpupdate

     
  14. Open Citrix --> Management Consoles --> Citrix Web Interface Management.
     
  15. Select XenApp Web Sites and then right click on the Site URL. Select Server Farms.

     
  16. Click on Edit.

     
  17. Change the XML Service port to 8080 and then click OK.

     
  18. Perform the same steps for XenApp Services Sites and change to port of the URL to8080.

     
  19. Execute the command iisreset to restart the IIS service.

Deploying Acrobat Reader X (Version 10) using Citrix Installation Manager

Using Installation Manager you can deploy Acrobat Reader X to all of your Citrix servers using the following procedures.
  1. Dowonlaod full standalole package of Acrobat Reader X (Version 10) from HERE.
     
  2. Download Adobe Customization Wizard X from HERE.
  3. Install Adobe Customization Wizard X on the server - accecpt all defaults.
     
  4. Extract the Acrobat Reader X exe using the following command:

    AdbeRdr1000_en_US -nos_ne


  5. Wait for the window that pops up to do its work.
     
  6. Once extraction is complete, go to the following path to check the extracted folder. You will get the folder Adobe. The Acroread.msi file can be found inside that folder.

    C:\Documents and Settings\All Users\Application Data


  7. Now open Adobe Customization Wizard X.
     
  8. Click on File --> Open and open the AcroRead.msi file.
     
  9. Go to EULA and click on Suppress Display of End User License Agreement (EULA).


  10. Click on Online and Acrobat.com Features and select Disable all updates and Disable all Acrobat.com access, including initiation and participation check boxes.


  11. Save the package from File --> Save Package.


  12. It will create two extra files in the same folder of AcroRead.msi. These two files are:

    AcroRead.mst
    AcroRead.ref


  13. Copy all the files inside that folder. Create a shared folder and paste there.


  14. Now open Citrix XenApp Advanced Configuration. Go to Installation Manager --> Packages. Right click on it and select Add Package.


  15. Select AcroRead.msi from the shared path by clicking on the Browse button and then enter the Package Name. click OK.


  16. Click No.


  17. Click OK on the confirmation message.
     
  18. Right click on the package name you have created and then click on Install Package.


  19. Add the server(s) on which you want to deploy that package and then click on Next.
     
  20. Click Finish to deploy the package immediately.


  21. On successful deployment you will get the status as Success in the Citrix Access Management Console.

Datastore Backup and Restore (SQL 2005)

Here is the step-by-step procedure about how to backup Citrix database on SQL 2005 server.

Note: Do not use DSMAINT BACKUP builtin Citrix command. This command is only used if you want to take backup of MS Access or MSDE database.

Backup up database

Steps
  1. Log into the database server and open Microsoft SQL Server Management Studio.
  2. Navigate to the Citrix/XenApp database. Here I am using the database named "XenApp".
  3. Right Click on the database --> Tasks --> Back Up

     
  4. Select the backup type. The default is Full. I prefer to use Full database backup as the database size is very small. 
     
  5. Click on Option. Keep the default options. To schedule the backup job click on Script and then select Script action to job.


  6. Go to Schedule and click on New to create a backup schedule.


  7. Click OK thrice to start and schedule the backup process. Once database backed-up successfully, you will get the following notification.

     
  8. The default backup location is C:\Program Files\Microsoft SQL Server\MSSQL.1\MSSQL\Backup\
Restoration
The backedup database can be restore any time if you feel datastore has been corrputed. To do so perform the following steps.
  1. To restore, Right Click on Database and then select Restore Database.

     
  2. Select the To Database and From Database from the drop-down list. Here I have selected XenApp as this is the database I want to restore. 
     
  3. Go to Option and select Overwrite the existing database. Click OK to start the restoration procedure.

     
  4. After restoration is successfully completed, you will get the following message. Click OK to close the message.

The Terminal Server has exceeded the maximum number of allowed connections

Problem

If  users simply close the remote desktop window; their sessions remain disconnected and if TS Session is not configured to end the disconnected session after a certain time limit, further user login to that terminal serer won't be possible due to the following error:


Resolution
  1. Open Command Prompt and execute the following command:

    query session server:<server name>(OR)
    query session server:<IP address>

    Replace the <server name> or <IP address> with the remote machine host name or IP address.

    For example, query session server:TS-1[Note: Here TS-1 is the Terminal Server host name I am using.]


  2. This will show the details of the connected or disconnected users. Note down the ID and corresponding username you want to reset.

  3. To reset a particular ID execute the following command:

    reset session <ID> /server:<server name>

    For example, reset session 2 /server:TS-1
     
    [Note: 
    You can also use a nice GUI tool to query and reset the remote sessions. Please click HERE to download the tool named Remote TS Manager from JR Software]


    Here I have resetted all the users sessions existing on the TS-1 server.
     
  4. To check the session status execute the command mentioned in Step:1.

    query session server:<server name>(OR)
    query session server:<IP address>


  5. Now if you try to RDP to that server, you will be able to do that.
     
  6. Once you logged in to the server, go to Start --> Programs --> Administrative Tools --> Terminal Services Configuration.
     
  7. Right click on RDP-Tcp --> Propreties.


  8. Enable Override User Settings check box and enter the time in End a disconnected session. This will prevent to occur this type of problem going forward.

Alternative method to reset user session (GUI Based)
  1. Login to any other server.
     
  2. Go to Start --> Administrative Tools --> Terminal Services Manager

     
  3. Click on Actions --> Connect to Computer...--> enter the server name where you want to connect --> click OK
     
  4. Now you will get all sessions of that server. Right click on the desired user and choose Log Off.

How to check the installed ICA Client Version

To check the installed ICA Client version go through the following steps.
  1. On the client desktop go to C:\Program Files\Citrix\ICA Client.
  2. Open version.dat file in Notepad to check the version of the ICA client.


How to check the Web Interface version


To check the version of the Web Interface go through the following steps:

  1. On the Citrix server go to C:\Program Files\Citrix\Web Interface
  2. The folder name inside the above path will indicate the version of the Web Interface.